1. Introduction
TeamKazi is a collaborative, multi-tenant task management platform designed to help teams organize, assign, and track work efficiently. It provides a centralized workspace where different users—including internal staff, clients, supervisors, and accountants—can interact based on their roles and responsibilities.
TeamKazi is built on a multitenant architecture, meaning each company that registers on the platform gets its own isolated workspace. After registration:
- The supervisor (admin) receives a unique company domain (e.g., companyname.teamkazi.com).
- All user interactions—from login to task management—happen within this private domain.
This ensures that data is securely separated between companies, and users only access information relevant to their organization.
User Roles
TeamKazi supports four types of users, each with tailored access based on their responsibilities:
Supervisor
- Acts as the admin of the company account
- Has full access, including user management and settings
Staff
- team member
- Access to:
- Dashboard
- Tasks
- Tickets
- Site Visits
- Updates
- Scheduler
- Forum
Client
- External stakeholder or customer
- Access to:
- Dashboard
- Tickets
- Site Visits
Accountant
- Finance-focused user
- Access to:
- Dashboard
- Updates
- Billings
Key Features
-
Dashboard – Visual summary of tasks, activity, and updates
-
Tasks – Create, assign, and track task progress across teams
-
Tickets – Manage and resolve issues or support requests
-
Site Visits – Record and schedule physical or virtual visitations
-
Updates – Share team progress, milestones, and announcements
-
Scheduler – Plan tasks and site visits with a shared calendar
-
Reports – Generate summaries and performance reports
-
Forum – Enable discussions and internal communication
-
Billings – Track company billing and invoicing
-
Settings – Administer users, permissions, and preferences
Use Case
TeamKazi is ideal for teams managing complex workflows, especially where coordination between internal staff and external clients is needed. It ensures:
- Clear role-based access
- Smooth task tracking
- Transparent reporting
- Secure company separation via multi tenancy
Getting Started with TeamKazi
TeamKazi gives each company its own private workspace while keeping everything on one secure platform.
Think of TeamKazi like an apartment building:
- The whole building is the TeamKazi platform
- Your company's workspace is your private apartment (like yourcompany.teamkazi.com)
- Only your team has keys to access your space
- Other companies can't see or enter your workspace
How to Set Up Your Company Workspace
-
Registering on TeamKazi
- Visit TeamKazi.com
- Click "Get Started" to register. Fill your details in the form and check the term and conditions checkbox before clicking submit
- Submit the form - you'll get a verification email on successful registration
- Click the one-time link in the email to verify your email (once the link is used it cannot be used again)
- Once the email is verified now you can proceed to the login page, Use the email and password entered during registration to login
-
Create a new compoany on TeamKazi
- After loging in, click "Add Company" in your Admin Dashboard
- Fill in your company information (Name, Number of Users, Use Type..). Then click Submit
- TeamKazi automatically creates your private address (e.g., yourcompany.teamkazi.com)
- You'll receive an email with a "Set Password" link, and the company details on successffull creation of a company
-
Accessing the workspace of the created company
- Click the "Set Password" link in your email received after successfull creation of the company
- Enter your secure password on the form ( The password will be used for other logins unless changed)
- Click submit, You'll automatically be directed to your company's private workspace
- The first user to login to the copany private domain becomes the Supervisor (with full access)
-
Adding other users/team members on TeamKazi
- Go to Settings → Users → "Create User"
- Enter their name, email, and role (supervisor/Staff/Client/Accountant)
- On successffull cretion the cretaed user will receive an email with the company details and a link to set password
- Clicking on the link the user will be directed to set a password (the password will be used when accessing their account)
Remember: Your company's workspace (e.g., yourcompany.teamkazi.com) is completely private. Only people you invite can access it, and they'll only see what you allow them to see.
Forgot Password
In case you forget your password, follow these steps to reset it:
- On the login page, click "Forgot Password?"
- Enter your email address.
- Click "Send Reset Link".
- Check your email for a password reset link.
- Click the link in the email.
- Enter and confirm your new password.
- Click "Reset Password".
- Log in with your new password.
Dashboard
This section outlines the different dashboards available to each user role in the system, detailing their unique features and permissions.
Supervisor Dashboard
The Supervisor Dashboard provides an overview of tickets and system usage, allowing supervisors to manage and monitor all ongoing activities. Key features include:
- Viewing the number of tickets (Pending, On Hold, Overdue)
- Access to product, company, and user stats
- Creating new tasks, users, projects, or PODs
- Filtering and managing tasks based on status
- Viewing ticket and site visit statistics
Client Dashboard
The client dashboard provides a summary of ticket activity, including raised, pending, on hold, and closed tickets. It also includes a button to create a new ticket and a table listing all existing tickets.
Staff Dashboard
The staff dashboard provides a comprehensive summary of tickets and site visits. It also includes a button at the top for creating a new task, and another button in the tickets section for creating a new ticket.
Accountant Dashboard
The accountant dashboard provides a summary of subscription and billing status. It shows the number of bills pending, in progress, paid, and overdue, as well as the subscription due day.
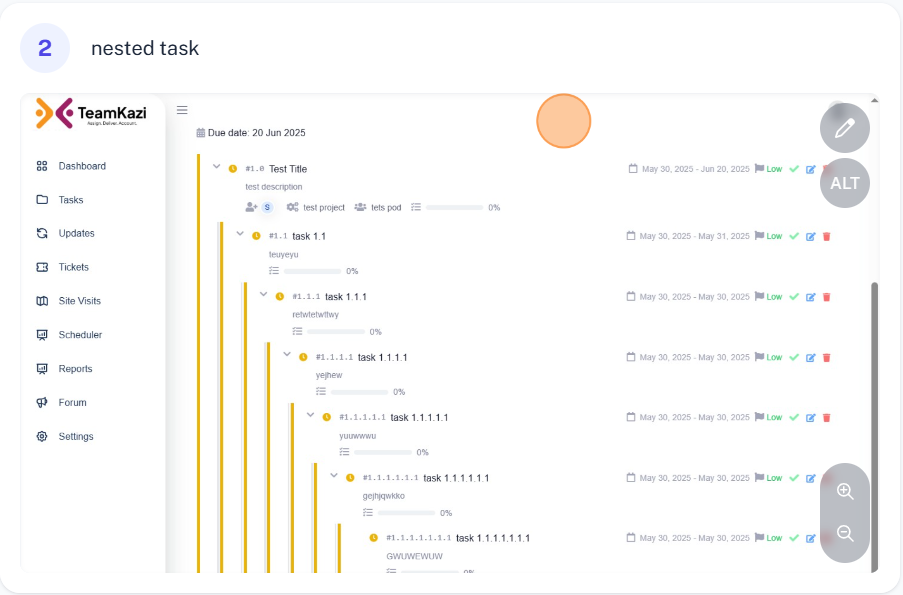
Tasks
In TeamKazi, both supervisors and staff can create and manage tasks. The platform supports a hierarchical task structure with these rules:
- Unlimited parallel tasks: Any task can have unlimited sibling subtasks (e.g., #1.0, has subtask #1.1, #1.2... ).
-
7-level nested depth: Subtasks can be nested up to 7 levels deep, #1.1.1.1.1.1.1 (Level 7) . Attempts to add an 8th level (e.g., #1.1.1.1.1.1.1.1) are automatically blocked.
- docs.tasks.rule2_note
-
Visual clarity: Each task displays:
- A numbered title reflecting its hierarchy (e.g., #21.1.1 T1)
- An optional description (e.g., "D1")
- Progress tracking (f=0%)
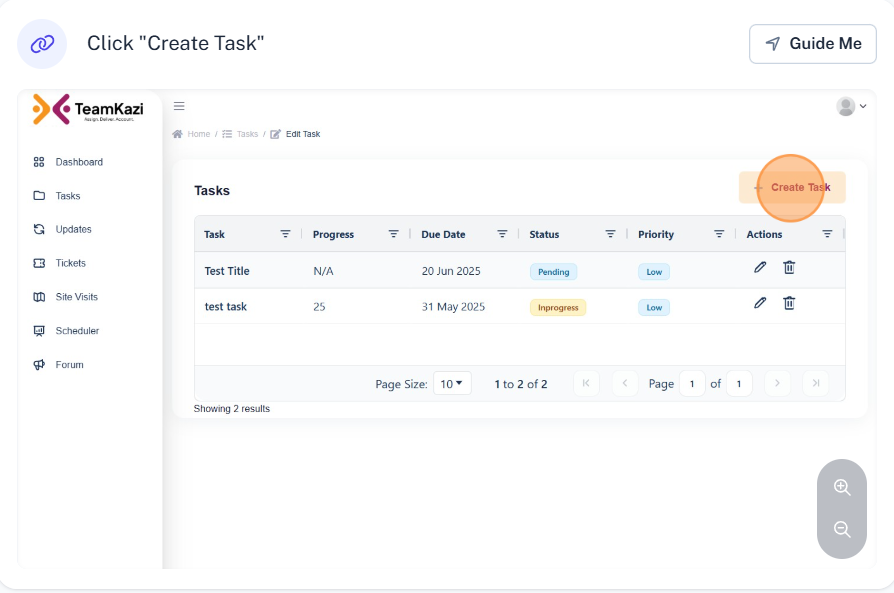
Creating Tasks
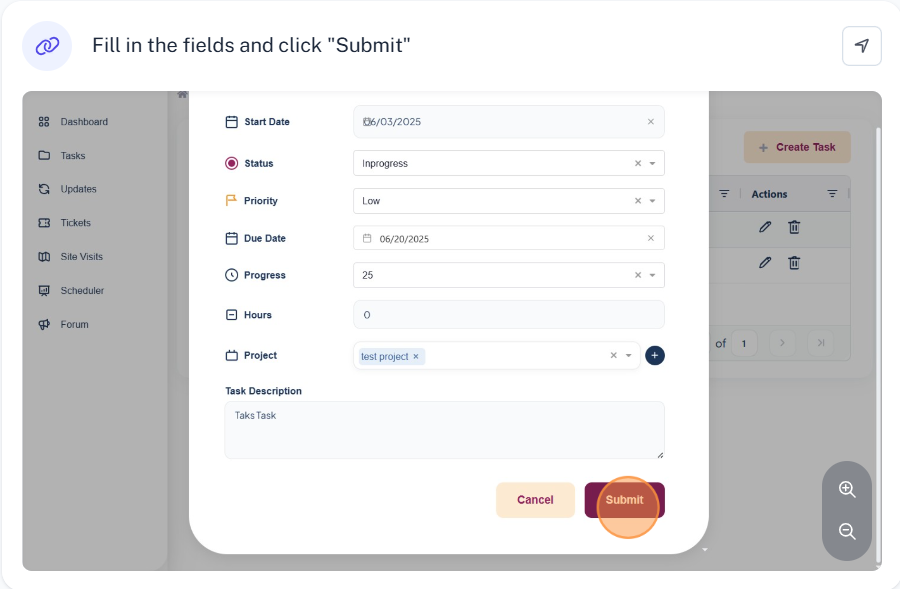
- Navigate to Task → "Create Task"
- Fill in the details of the task in the form. for POD, Project and Asssign Staff fields they are optional and are only available on the supervisors form only.
- Click "Submit" to create the task.
Note: Staff can delete only the tasks they created. For tasks created by a supervisor and assigned to them, staff cannot delete these tasks.
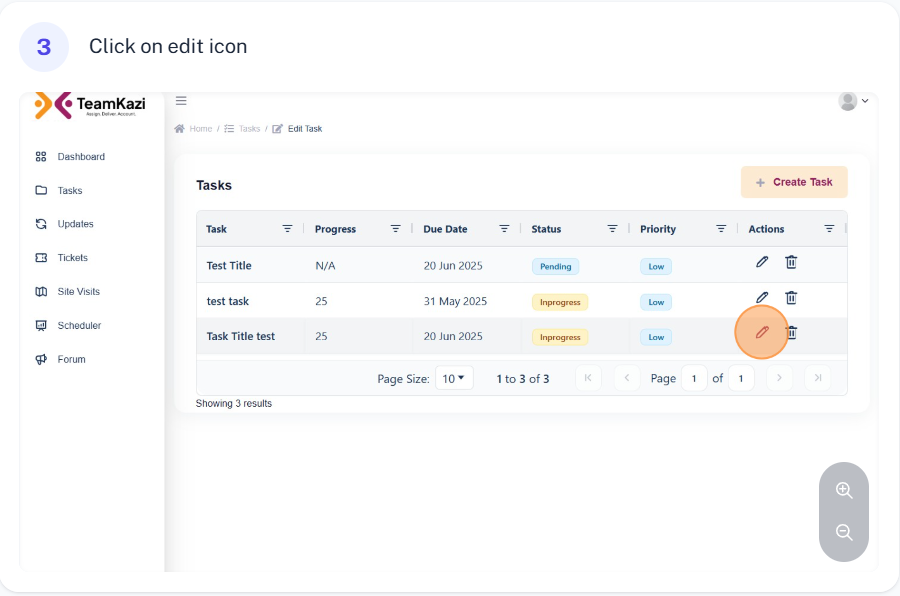
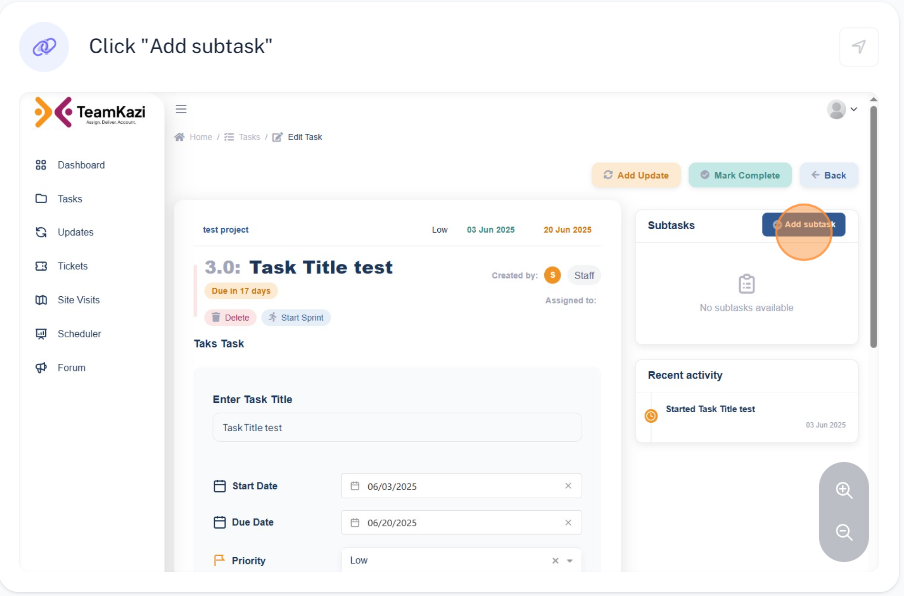
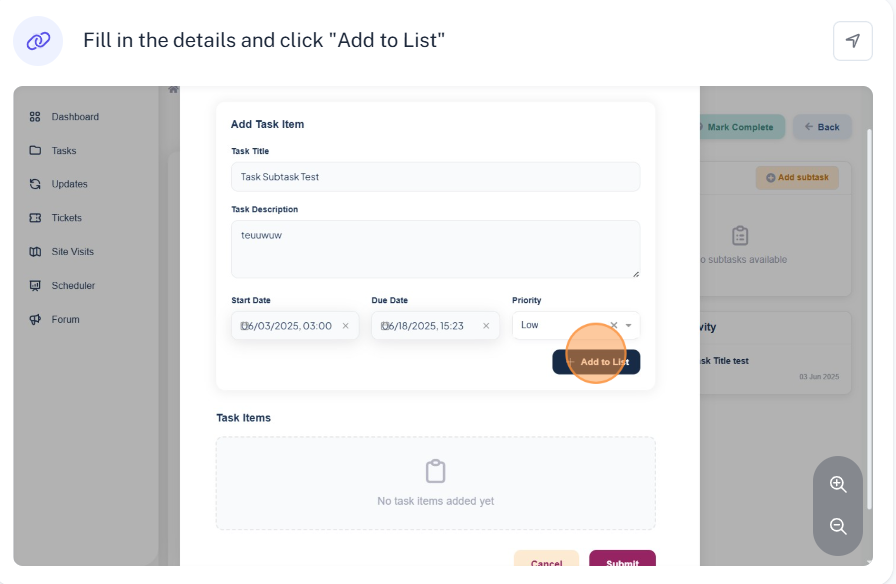
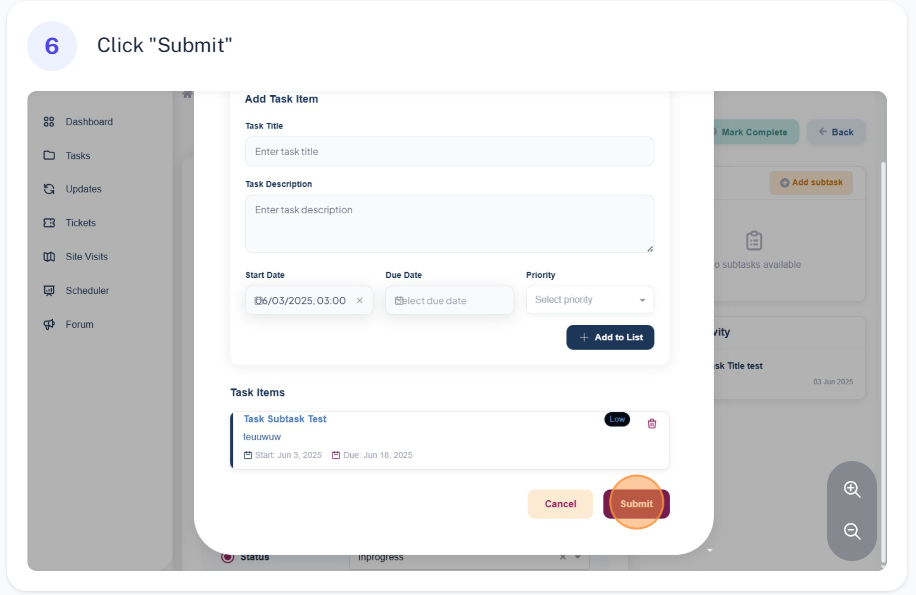
Adding a Subtask
- Click on the Edit icon on the task you need to add a subtask
- Click on "Add Subtask"
- Fill in the details of the subtask in the form
- Click "Submit" to create the subtask.
Note: Staff can delete only the tasks they created. For tasks created by a supervisor and assigned to them, staff cannot delete these tasks.
Practical Guide:
For supervisor the process of creating the task and editing, delete marking as complete is similar to the one illustrated above for staff, with a slighter difference that the supervisor can assign a project, user, and pods when creating a task which are optional.
Updates and Progress Tracking
This feature helps you share what you're working on or what you've completed. Think of it like a work diary that shows your past and current activities (but not future plans). In teamkazi you can give an update of the whole task or per sprint.
What's the Difference Between Tasks and Sprints?
📋 Task = A task is like a complete homework assignment. For example: "Build User Profile" (all parts: uploading photos, changing passwords, deleting an account, e.t.c)
⏱️ Sprint = Sprint is like setting a timer to work on part of your task: (e.g working on uploading photo and changing password from 12pm to 12:30pm)
How to Create Updates
📋 For General Task Updates:
- Go to Tasks
- Click "Edit icon for the tasks you want to add update"
- Click Add Updates
- Add your commet on the form field
- Click Submit
⏱️ For Sprint Updates:
- On your task, click "Start Sprint" (This adds the sprint on calendar view under updates)
- Work on your task (e.g., "Fixed photo upload feature")
- Navigate to Updates
- Click on the sprint added
- Add your comment on the form field
- Click Submit
- When done, click "complete Sprint"
For a sprint update it is shown on a calendar view.
Tip: Use sprints when you want to track time spent, and task updates for general progress reports!
Tickets
In Team Kazi, a ticket is a recorded issue or request—such as a problem, bug, or support need—raised by a client, staff member, or supervisor, and includes details like the description, reporter, date, status, and assigned personnel.
Below is the workflow and the steps followed when a ticket is raised by a staff member, client, or supervisor in Team Kazi.
Supervisor Ticket Workflow
- Supervisor Creates Ticket and Assigns to Staff
- The supervisor creates a ticket and assigns it to a staff member.
- Ticket Status: In Progress
- The assigned staff member receives an email notification about the new ticket.
- Both the staff and the client can see the ticket on their respective accounts after the ticket is created.
- Staff Views and Works on Assigned Ticket
- The staff logs into their account and views the assigned ticket.
- The staff works on the issue raised in the ticket.
- Ticket Completion by Staff
- Once the issue is resolved, the staff marks the ticket as completed.
- The ticket status changes from "In Progress" to "Ready".
- The client receives an email to confirm whether the issue is completely solved and to confirm the ticket.
- Client Confirms Ticket and Provides Review
- The client confirms the ticket and provides a review.
- The ticket status changes from "Ready" to "Complete" once the client confirms the work and submits their review.
- Supervisor receives email on the confirmed ticket
- Supervisor Closes the Ticket
- The supervisor now closes the ticket from their end.
- Email is sent on the closure of the ticket
Flowchart:

Note: When a supervisor closes the ticket at the early stage before the client and staff confirms it, that is the end of the ticket. Both client and staff cannot perform any other actions.
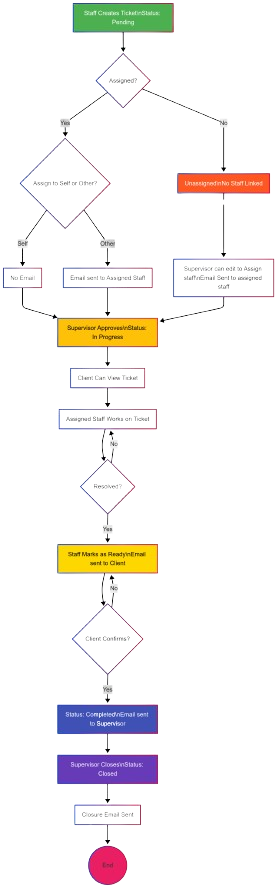
Staff Ticket Workflow
- Ticket Creation
- A Staff member raises a ticket.
- Status: Pending
- The staff member may:
- Assign the ticket to themselves or another staff member.
- Leave the ticket unassigned (no staff is initially assigned). automatically assigns it to the one who created
- If assigned to any other staff the assigned staff receives email for the assigned ticket
- Supervisor Actions
- Approves the ticket now is in progress, client can now see the ticket on his side
- If no staff is assigned, supervisor can assign a staff
- Ticket Handling by Assigned Staff
- The assigned Staff works on resolving the ticket issues.
- Once resolved:
- Gives the observation and reviews and marks the ticket as completed if issues is completely solves.
- Status: Ready
- The Client receives an email notification to review and confirm the ticket.
- Client Review and Confirmation
- The Client logs in, gives reviews of the ticket resolution, and confirms if satisfied.
- Upon confirmation:
- Status: Completed
- The Supervisor receives an email notification about the client's approval.
- Supervisor Closure
- The Supervisor reviews the completed ticket and marks it as Closed.
- Status: Closed
- A final email notification is sent confirming the closure.
Flowchart:
Client Ticket Workflow
- Client Raises Ticket the status of the created ticket is pending. Only the supervisor can see the created ticket.
- Supervisor can now edit the ticket from his end to assign staff and pods then approve the ticket:
- On editing the ticket and assigning a staff, the assigned staff now receives an email to inform on the assigned ticket.
- Staff can login into the system from his end now and give observations, solutions provided and update on the status of the ticket. If the ticket is marked as completed by staff the status of the ticket now changes to ready. Client on the other end receives an email to notify them confirm the ticket and mark as completed from their end.
- Client logs onto their account and gives review, if the solution is completely provided then the client marks the ticket as completed, the status is updated to completed.
- Supervisor receives an alert email notification that the ticket has been confirmed by the client.
- Supervisor now can update the status of the ticket to closed.
- Closure email is sent.
- End.
Flowchart:

Note: When a supervisor closes the ticket at the early stage before the client and staff confirms it, that is the end of the ticket. No other actions can be performed.
Site Visits
A site visit is when a company's experts visit a customer's office or workplace to help set up, fix, or improve their software system in person. Sometimes, problems are too tricky to solve over the phone or online, so the team goes on-site to see the issue firsthand and make sure everything runs smoothly.
A site visit request in TeamKazi can be raised by either a supervisor or a staff member.
Supervisor Site Visit Workflow
- Creating a Site Visit
- Navigate to Site Visits.
- Click "Create Site Visit".
- Fill in details about site visit in the table
- click "Submit"
Note: The assigned staff and the client can view the site visit from their end. Client approves the site visit at this point
Note: Site visit can only be conducted after the approval of the client.
- Staff Action
- Navigate to site visits page
- Edit the site visit to add the observation and the solution provided in the form
- Click Submit
At the end of site visit staff can update the site visit from his side by:
Note:After staff completes the site visit from his end, the status changes to ready , client also receives an email to confirm and complete the site vist from hios end also
Note:Cliet can only confirm and complete the site visit from his end once the staff is done
- Client Review
- Client now navigates to site visit
- Provides feedback and reviews on the form for the site visit
- Click Submit
Note:After client confirms the supervisor receives an email on the completion of the site visit by the client
- Supervisor Closure
- navigates to site visit and marks the site visit as completed
Flowchart:
Here is a practical guide:


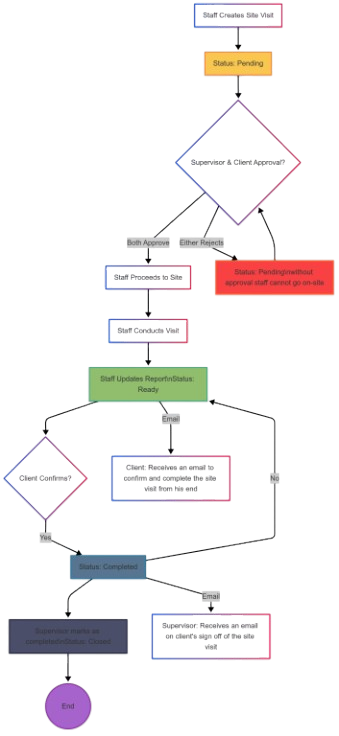
Staff Site Visit Workflow
- Requesting a Site Visit
- Staff navigates to Site Visits.
- Clicks "Request Site Visit".
- Provides details including purpose and suggested date.
- Submits the request.
- Supervisor Approval
- Supervisor receives notification.
- Reviews the request details.
- Approves or modifies the request.
- Assigns staff if different from requestor.
- Staff Completion
- Staff performs the site visit.
- Updates the site visit with findings.
- Adds recommendations and actions taken.
- Marks as "Completed by Staff".
- Client Confirmation
- Client receives notification.
- Reviews the site visit details.
- Provides feedback and rating.
- Confirms the site visit.
- Supervisor Closure
- Supervisor reviews all information.
- Makes final assessment.
- Closes the site visit.
Flowchart:
Scheduler
The Scheduler is available to supervisors and staff only.
- It displays all tasks, tickets and site visits along with their due dates in a calendar view(monthly, weekly or daily view mode can be enabled by clicking on the respective buttons).
- Supervisor sees all the scheduled items. For staff each staff sees only the items that are assigned to him/her on the schedule.
- Users can click on any scheduled item to view its details.
- This feature helps users track deadlines and manage time more effectively.
Reports
This page is restricted to supervisors only. Other user roles will not have access to the Reports section.
Automatic Report Generation
Upon clicking the Reports menu option, the system automatically generates a monthly report. The report covers tasks from the last 30 days, calculated based on the current date (e.g., April 2, 2025 – May 2, 2025).
Dashboard Summary
- Total Tasks: Displays the total number of tasks assigned during the reporting period.
- Completion Rate: Shows the percentage of tasks that have been completed.
- On-Time Rate: Indicates the percentage of tasks completed on or before their due date.
- Overdue Tasks: Displays the number of tasks that were not completed by the due date.
Visual Reports
- Completion Timeline
- A bar chart showing the task completion percentage over the reporting period.
- This visual helps track team performance on a day-by-day or week-by-week basis.
- Completion Breakdown
- A pie chart categorizing tasks into:
- Completed On Time
- Completed Late
- Overdue
- In Progress
Export Functionality
- A "Export CSV" button is available for supervisors to download the full report data for further analysis or sharing.
Forums
The Forums module in the Team Kazi system is a discussion platform designed to facilitate communication and idea sharing between Supervisors and Staff.
Key Features:
- Topic Creation: Users can create new discussion threads to address issues, share updates, or seek input.
- Access Control: Only Supervisors and Staff have access to this feature.
- Edit & Delete Permissions: The original author of a topic or comment has the ability to edit or delete their own posts to maintain accuracy or relevance.
- Structured Discussion: Topics are displayed in an organized manner, supporting clear and traceable communication.
The Forums feature enhances internal collaboration by allowing users to document and follow up on important discussions in a centralized space.
Workflow
- Supervisor or a staff member logins to the system.
- Click on the forum module
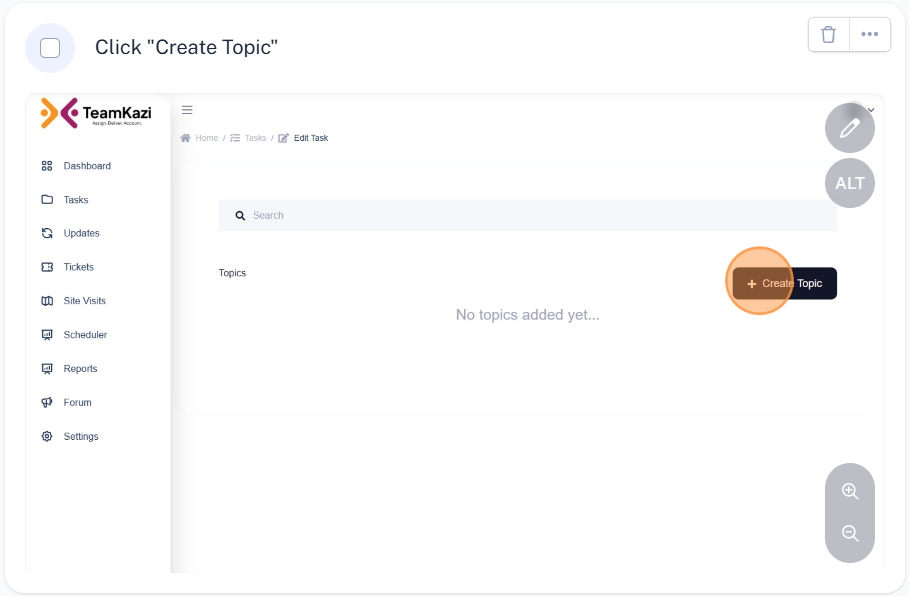
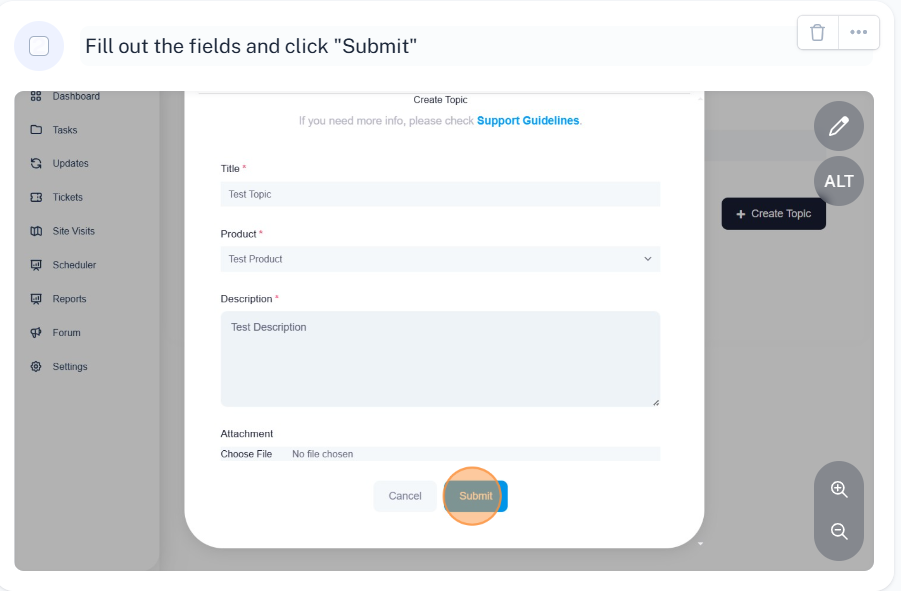
- Click on the create topic button to create a new topic
- Enter the topic details and submit to post it.
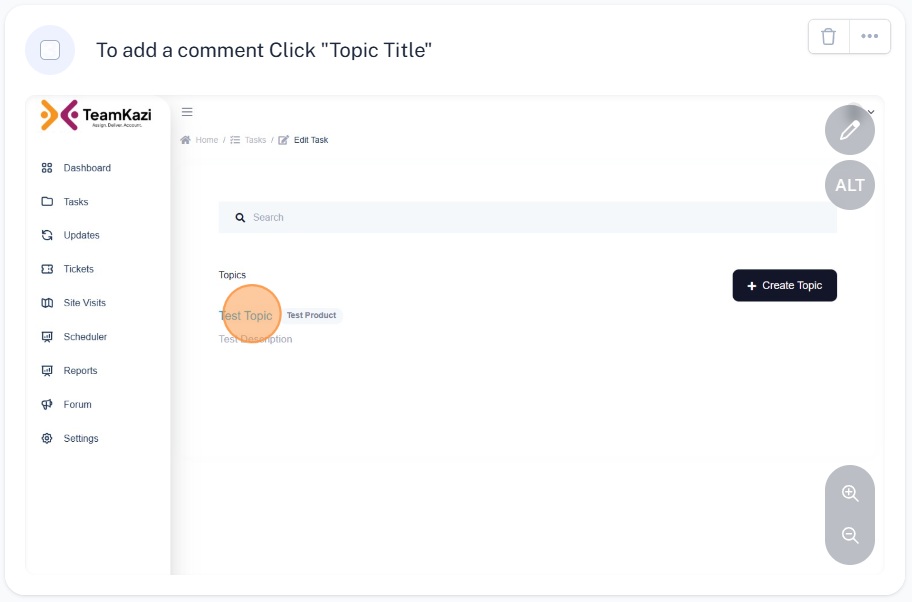
- To reply click on the title of an existing topic to open it.
- Enter a comment in the input field and click Submit to reply.
- On the newly opened page, add your comment on the field and click on submit.
- Users can edit or delete only the topics or comments they have posted.
Here is a practical guide:
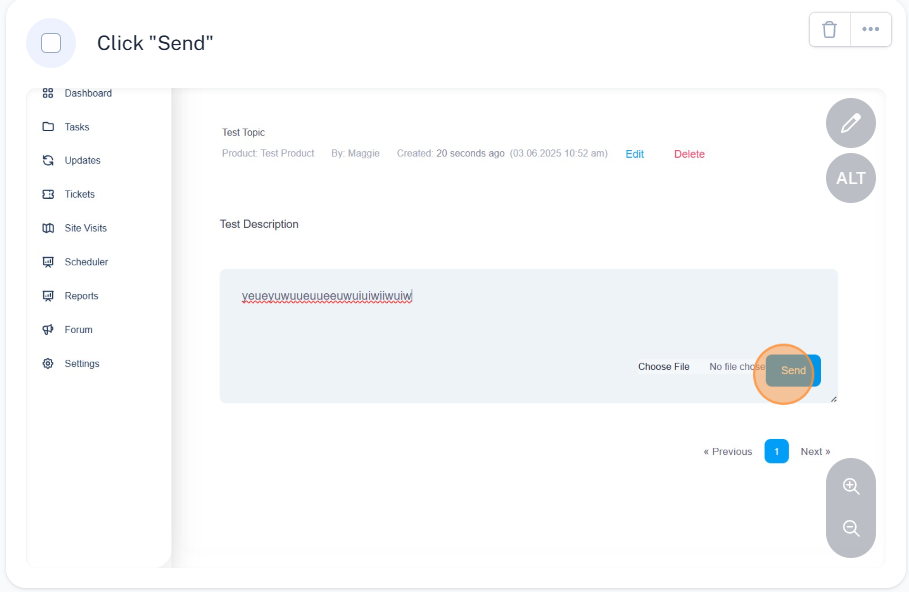
Supervisor or any other staff can add their comment to the created topic.
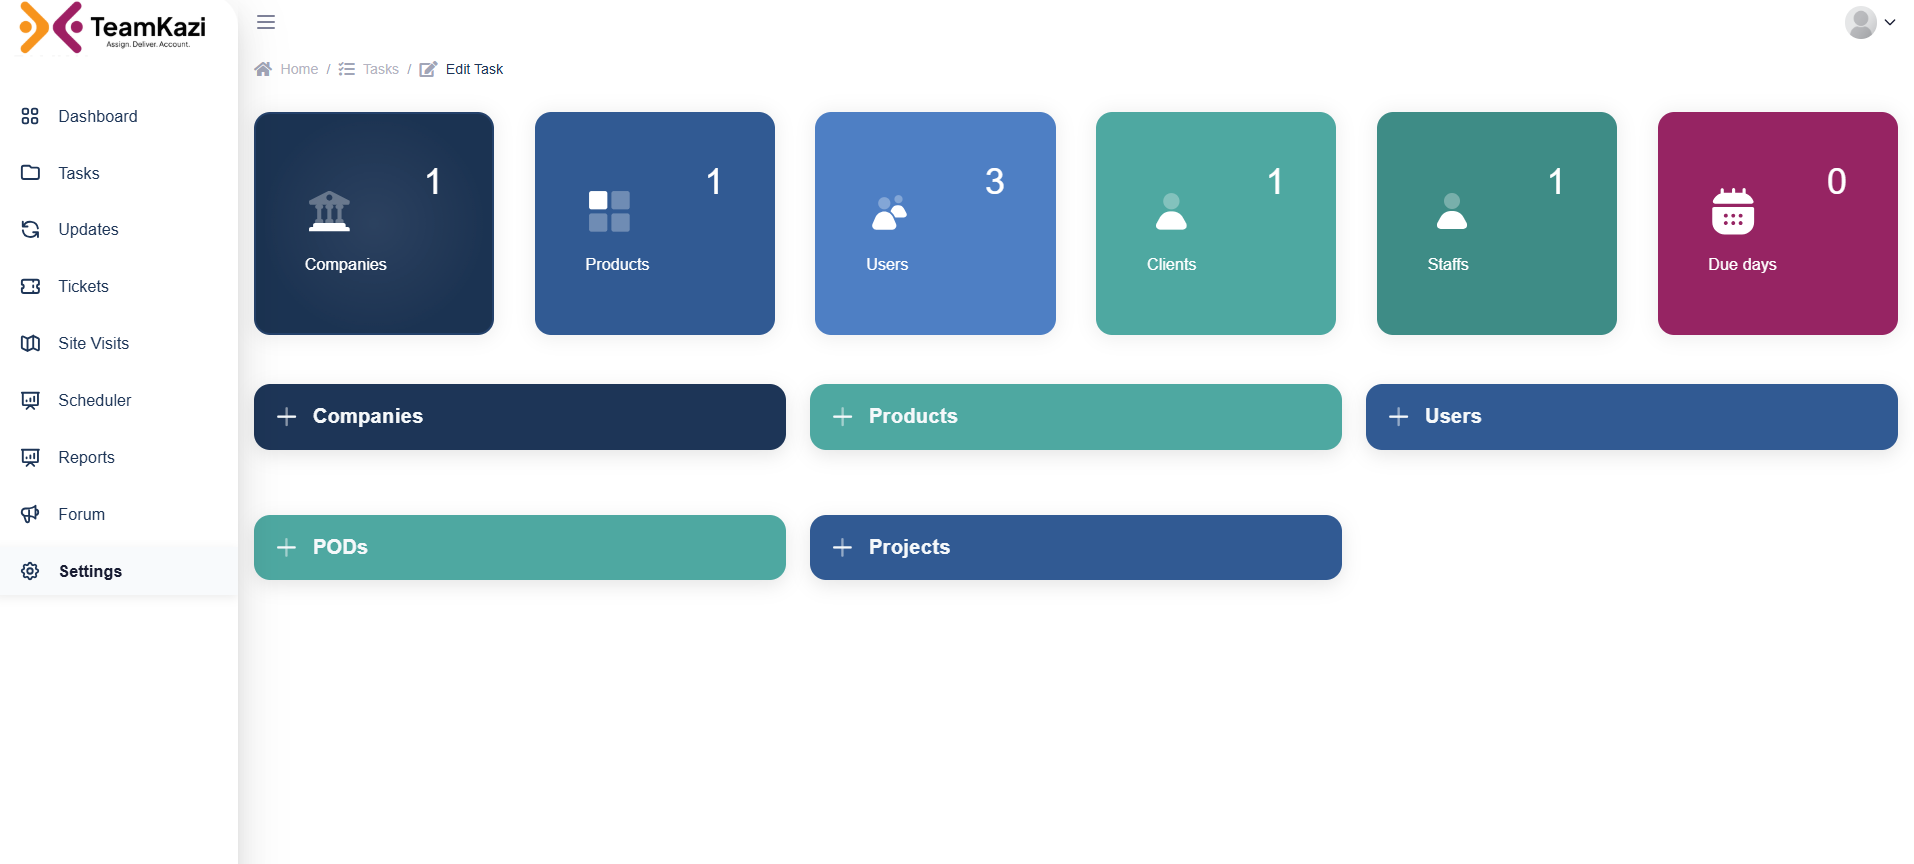
Settings
The Settings Page is an administrative dashboard exclusively accessible to Supervisors. It provides centralized control for configuring the core elements of the system. From this page, supervisors can manage the following:
- Companies: View and register organizations using the system.
- Products: Add or update product details offered by the company.
- Users: Manage system users including staff, client, and accountants
- Due Days: Define and update subscription or project deadlines.
- PODs: Add and manage POD entries.
- Projects: Create and manage ongoing or upcoming projects.
- Subscription Due Days: Set timelines for subscription renewals.
- Bulk Import Tasks: Import task data in bulk for efficient onboarding.
Additionally, quick-action buttons at the top allow supervisors to rapidly create:
- Tasks
- Users
- Projects
- PODs
This structured layout ensures all configuration activities are accessible in one location, supporting seamless administration and setup.
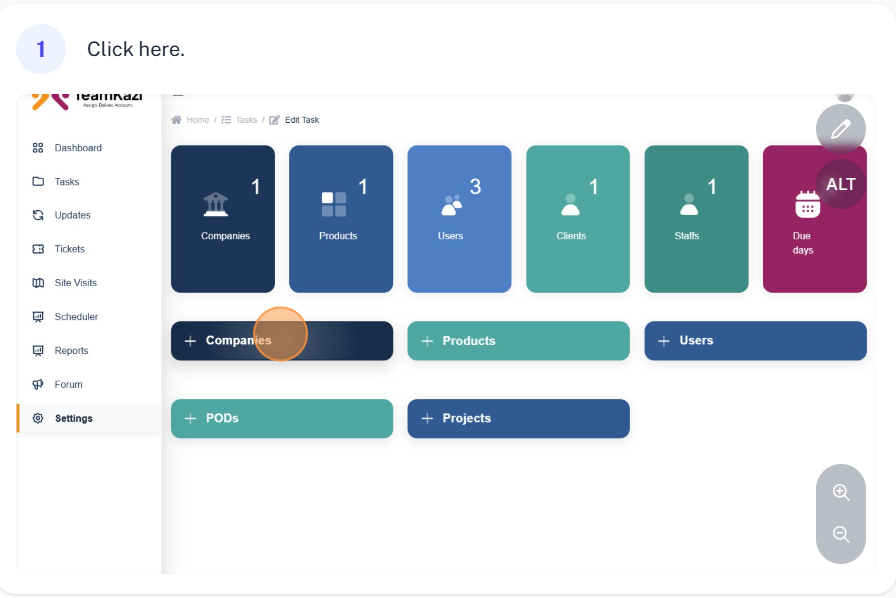
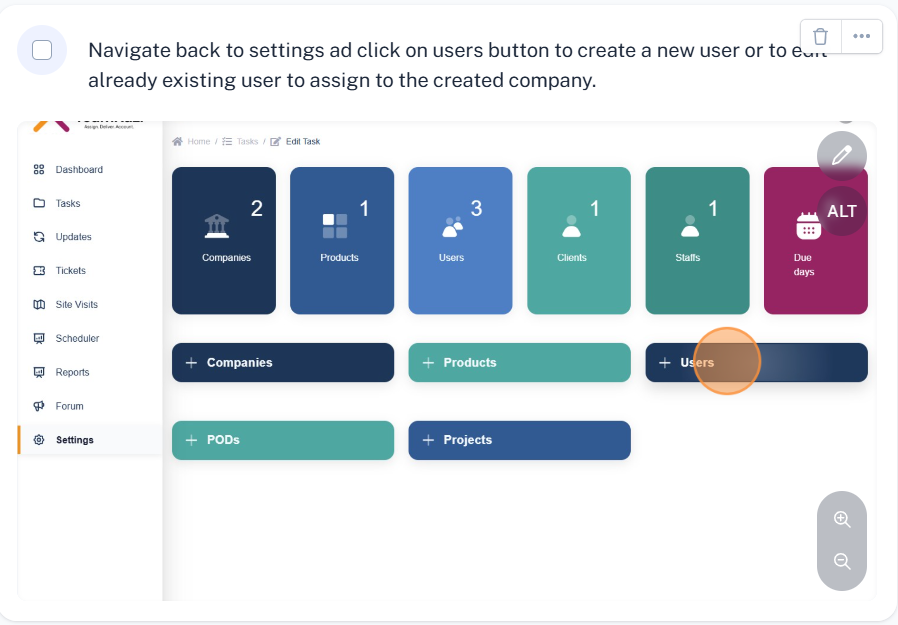
To create a company follow the following steps.
- Click on the "+ company"
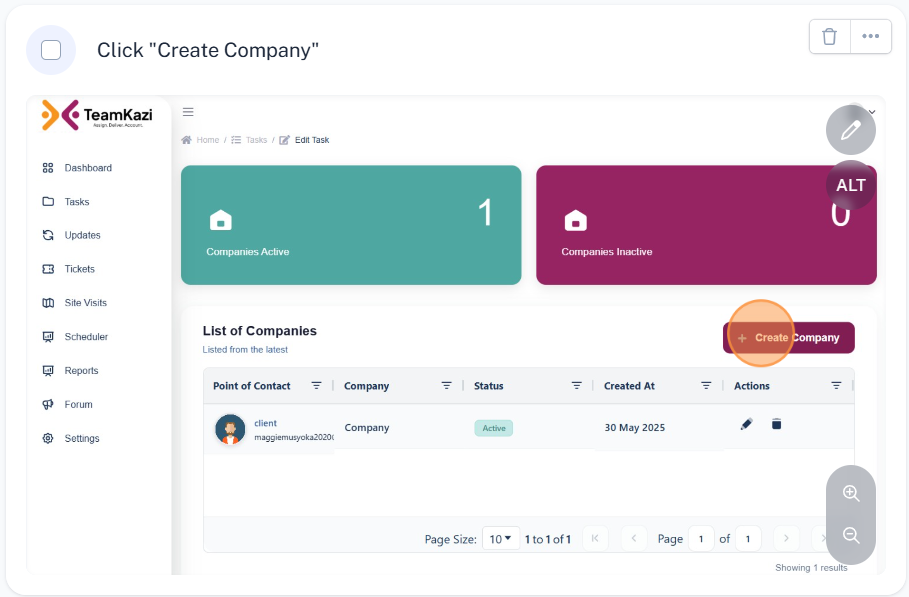
- Click "Create Company"
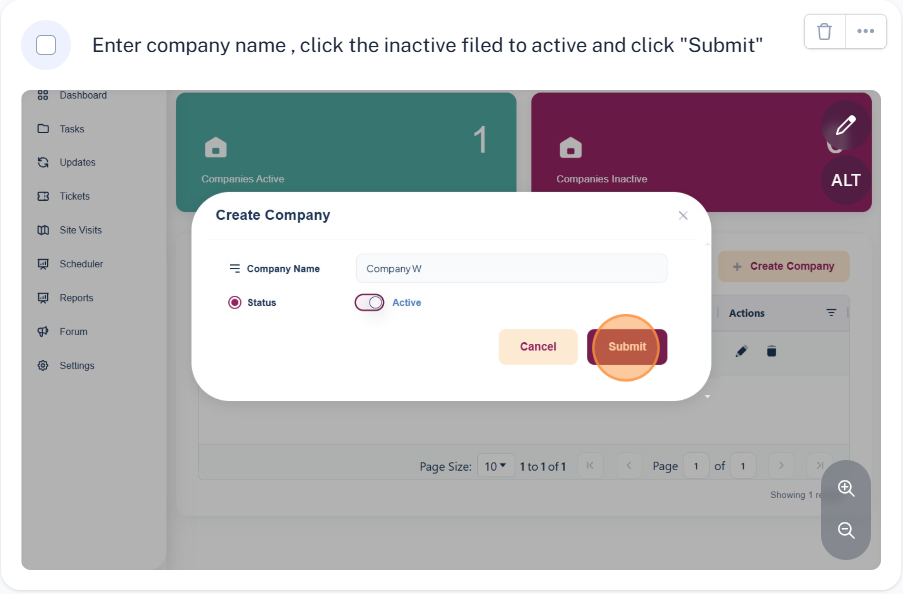
- Add the company name on the field and click submit.
- Now to add a point of contact. Navigate to users and look for the client you want to assign the point of contact.
- Click on the edit button.
- Now change their company to the created company.
- Or create a new user with a client role and assign him to the company in choice.
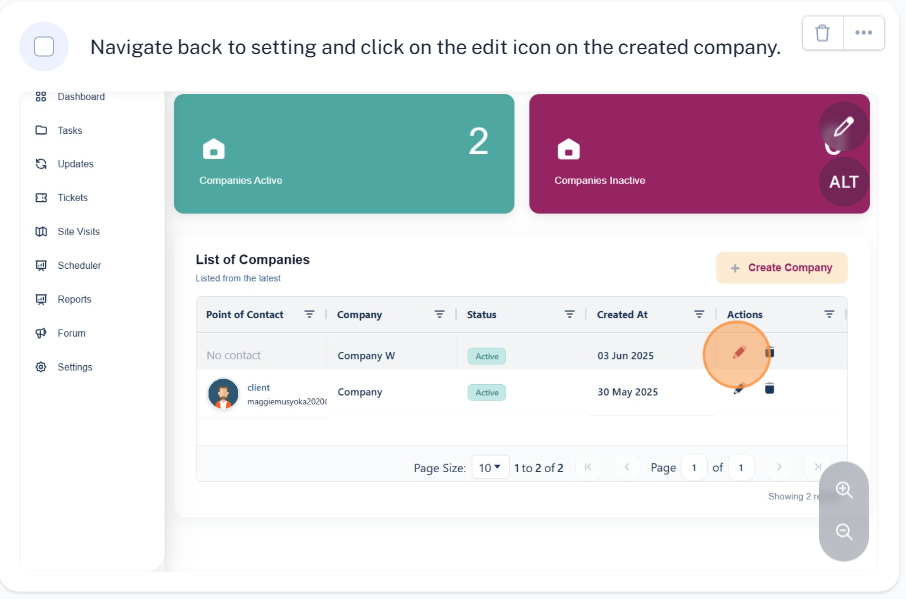
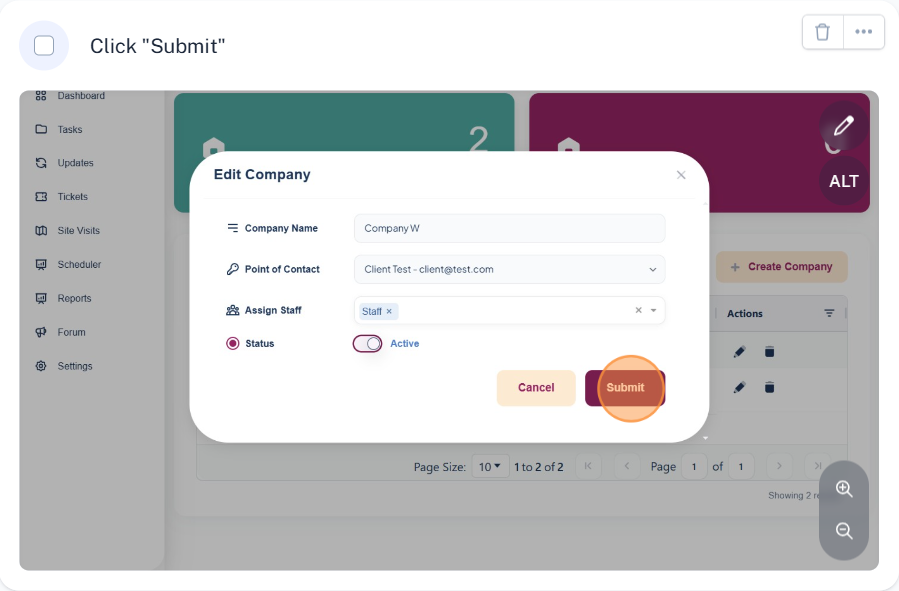
- Now navigate back to companies and click on the edit icon.
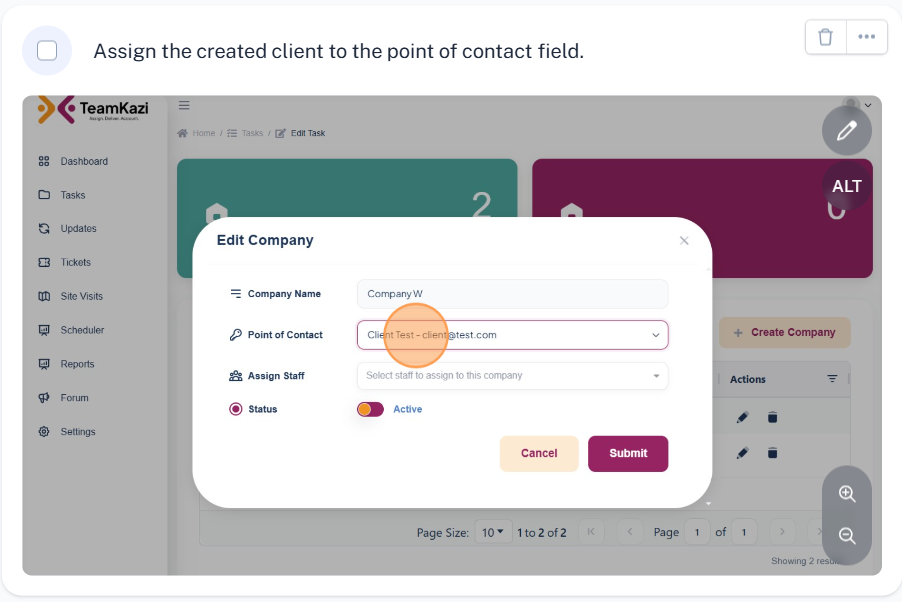
- Under point of contact dropDown select the client.
- Click submit to assign the client.
How to add a point of contact to the created company
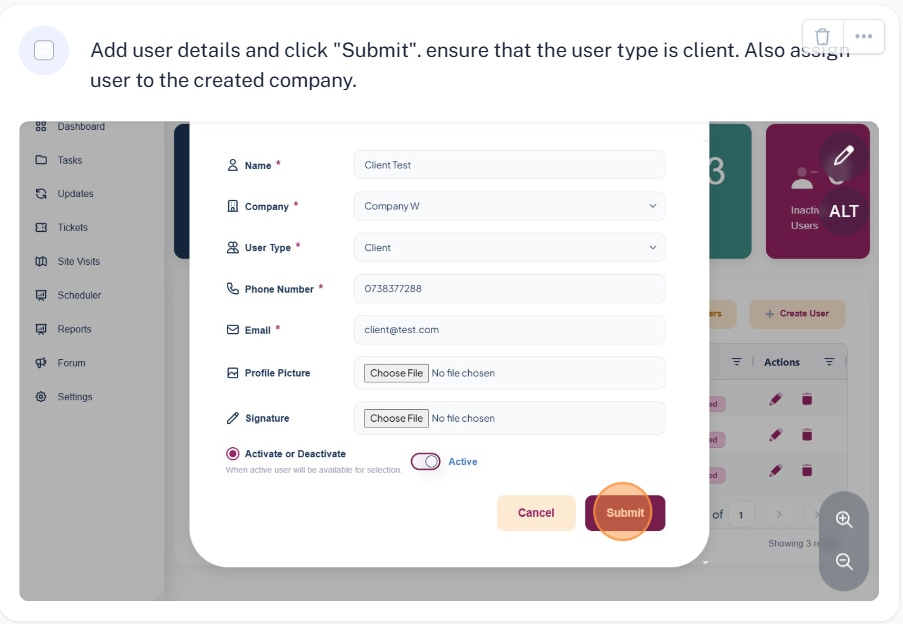
- Navigate to user list.
- Create a new user and assign him to the created compnay or edit an existing user and change their company.
- Navigate back to companies and click on the edit icon.
- Under point of contact dropDown select the client to assign.
- Click submit to assign the client.
Note:Only client users can be assigned as point of contact
Below is a step by step guide on how to add a point of contact.
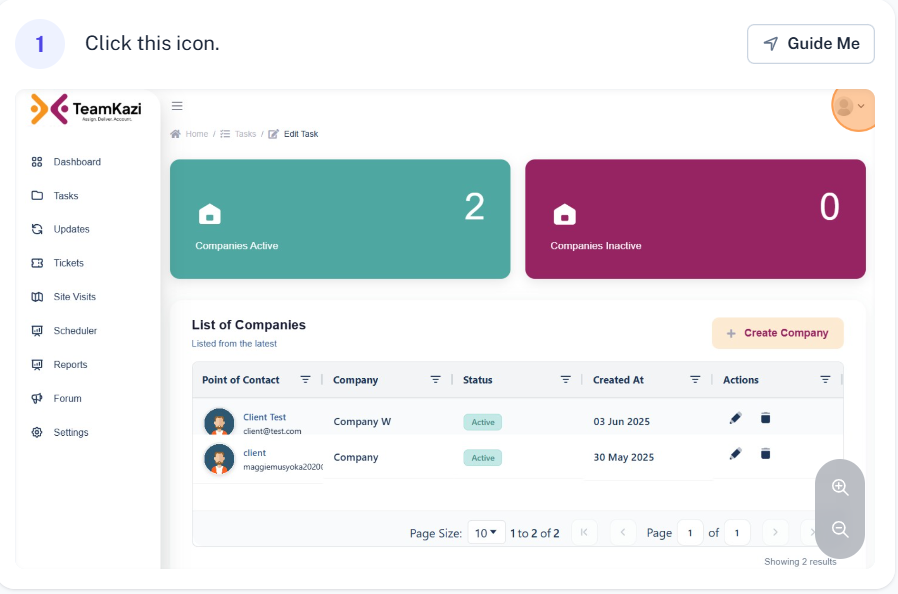
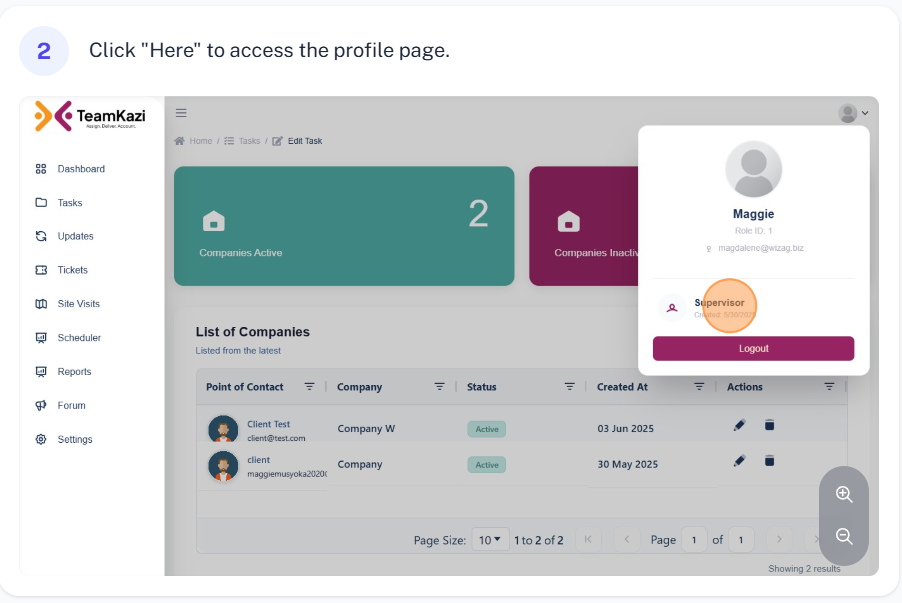
Profile
Each user has access to a Profile section where they can manage and update their personal information. The features available under the profile section include:
- Updating personal details such as name, contact information, and email.
- Changing their account password for enhanced security.
- Uploading a profile picture or relevant documents (if applicable).
These options allow users to maintain accurate and secure account information.